It’s 5: 30 PM, and I’m staring into the fridge like it’s going to give me answers. I’ve got leftover chicken, cheese, and random veggies. Enter Homemade Hot Pockets. These little pockets of goodness are way better than anything you’ll find in the freezer aisle.
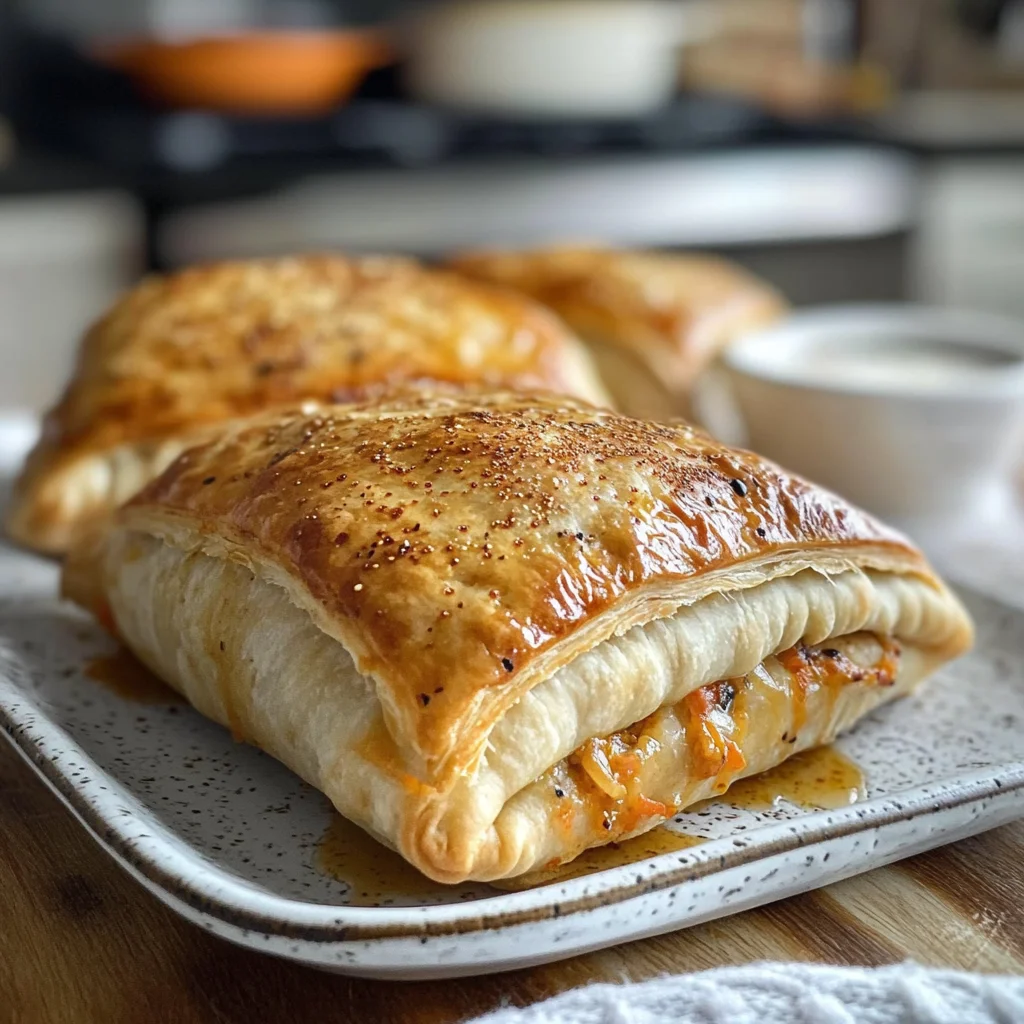
These are perfect for nights when you have 20 minutes and zero plan. You get to control what goes inside—so feel free to skip the processed stuff and load ’em up with your favorite ingredients (trust me, it makes a difference). Whip these up fresh and you won’t regret it. Dinner’s saved!
Why You’ll Love This Homemade Hot Pockets
- Super Easy: Just mix, roll, and fill — you won’t believe how quick it comes together (seriously, less than an hour!).
- Flavor Packed: You can customize the filling to whatever you love — BBQ chicken, veggies, or even breakfast stuff.
- Crisp-Tender Dough: The outer crust gets this amazing flaky texture that’s totally worth the effort. You’ll want seconds.
- Perfect for Meal Prep: Make a bunch and freeze them! Just know they’re best fresh out of the oven; reheating changes the texture a bit.
- Kid-Friendly Fun: It’s a hit with kids (and adults too) since everyone can pick their fave fillings. They’ll love helping out in the kitchen!
Homemade Hot Pockets Ingredients
For the Dough:
all-purpose flour (2 cups) — Use King Arthur flour for the best dough texture, or your pockets’ll be dense.
salt (1 teaspoon) — Don’t skimp on the salt; it brings out all the flavors, or it’ll be bland.
sugar (1 teaspoon) — Use granulated sugar, not brown; it’ll mess with the dough’s rise and texture.
butter (1/2 cup) — Go for unsalted butter; otherwise, they’ll be too greasy and salty.
cold water (1/2 cup) — Use ice-cold water to keep the dough flaky, or it’ll turn into a tough mess.
For the Filling:
shredded cooked chicken (1 cup) — Use rotisserie chicken for flavor; don’t even think about raw meat in this.
shredded cheese (1/2 cup) — Grab sharp cheddar for the best melt and flavor, or you’ll end up with bland cheese.
sliced green onions (1/4 cup) — Add fresh green onions for a kick; dried just won’t cut it here.
barbecue sauce (1 tablespoon) — Get a good-quality BBQ sauce, like Sweet Baby Ray’s; otherwise, it’ll be a flavor flop.
For the Egg Wash:
egg (1 large) — Use a large egg for a nice wash; skip it, and they won’t have that golden finish.
water (1 tablespoon) — Always use filtered water; tap water’s chemicals can ruin the dough’s rise.
Full measurements in the recipe card below.
How to Make Homemade Hot Pockets
1. Mix the Dough: In a large bowl, combine 2 cups all-purpose flour, 1 teaspoon salt, and 1 teaspoon sugar. It’ll start to smell nice and fragrant.
2. Cut in Butter: Cut in 1/2 cup cold butter until the mixture resembles coarse crumbs. It should feel crumbly — don’t overdo it or you’ll have a dense dough.
3. Add Cold Water: Gradually stir in 1/2 cup ice-cold water until the dough comes together. It should be slightly sticky but manageable; don’t rush this step!
4. Chill the Dough: Wrap the dough in plastic wrap and refrigerate for at least 20 minutes. This keeps it flaky — trust me, you don’t want tough hot pockets.
5. Prepare the Filling: Meanwhile, mix together 1 cup shredded cooked chicken, 1/2 cup shredded cheese, 1/4 cup sliced green onions, and 1 tablespoon barbecue sauce in a bowl. Set aside while you roll out that dough.
6. Preheat Oven: Now, preheat your oven to 400°F (200°C). You’ll know it’s ready when you can feel that warm air wafting out of it.
7. Roll & Shape: On a floured surface, roll out the chilled dough to about 1/8 inch thick and cut into rectangles (about 4×6 inches). Fill each with your mixture before sealing them up with a fork for that homemade touch.
Exact quantities in the recipe card below.
How to Store Homemade Hot Pockets
- Room Temperature: Keep them in an airtight container for up to 2 days. They’ll be fine, but the dough might get a bit soft (no one likes a soggy pocket).
- Refrigerator: Store in a tightly sealed container or wrapped in plastic wrap for up to 5 days. Just know the crust loses some of its crispiness (not ideal, but they still taste good).
- Freezer: Wrap each one individually in foil or freezer-safe bags. They can last about 2 months frozen. The filling will hold up well, but the dough might not be as flaky when reheated.
- Reheating: Bake from frozen at 375°F for about 20 minutes until heated through and the crust is golden and crispy again (you’ll smell that buttery goodness!). Just keep an eye on ’em so they don’t overcook.
What to Serve with Homemade Hot Pockets?
These pockets are a little rich and buttery, so pairing them with something fresh or crunchy helps balance it all out.
- Crisp Salad: A simple green salad adds a refreshing crunch and texture contrast that brightens each bite.
- Pickle Chips: The tangy acidity cuts through the richness perfectly. Plus, they’re super easy to grab from the jar.
- Roasted Veggies: Try roasting some broccoli or bell peppers while your pockets bake; it takes about 20 minutes and adds nice color.
- Fruit Salsa: A sweet and spicy fruit salsa provides acidity to balance the savory filling—mango or pineapple works wonders!
- Coleslaw: Creamy coleslaw gives you that crunch factor. Just whip up a quick batch with cabbage and dressing in under 10 minutes.
- Guacamole: The creamy avocado offers a smooth texture contrast, which pairs surprisingly well with the flaky pastry.
- Chips & Dip: Tortilla chips with salsa add an extra layer of crunch. You can prep this in about 5 minutes!
- Yogurt Sauce: A cool yogurt dip with herbs gives you a creamy element that complements the flavors beautifully without being overpowering.
Homemade Hot Pockets Variations
Here’s how to play with this recipe for Homemade Hot Pockets.
- BBQ Chicken Hot Pockets: Add 1 tablespoon of barbecue sauce to the filling mixture for a sticky-sweet kick.
- Cheesy Chicken & Onion: Use 3/4 cup shredded cheese instead of 1/2 cup for extra melty-gooey goodness.
- Spicy Kick: Mix in 1 teaspoon of crushed red pepper flakes with the chicken and cheese for some heat.
- Veggie Lover’s Delight: Toss in 1/4 cup diced bell peppers with the filling for a colorful crunch (add right before sealing).
- Next Level Flavor Bomb: Brush the tops with garlic butter before baking for a savory, aromatic finish.
- Chicken Ranch Twist: Replace barbecue sauce with 1 tablespoon ranch dressing in the filling for a creamy alternative (add with other ingredients).
- Cheddar & Green Onion Boost: Double the green onions to 1/2 cup for an extra punch of flavor and freshness.
Make Ahead Options for Homemade Hot Pockets
I like to prep the dough and filling for my Homemade Hot Pockets ahead of time. You can make the dough a day in advance and keep it wrapped tightly in plastic wrap in the fridge. The filling holds well too, but I wouldn’t let it sit longer than two days; just pop it in an airtight container. When you’re ready to serve, roll out the dough, fill ’em up, and bake right before you want to eat. The golden edges are best fresh out of the oven! Just remember, if you store these too long after baking, they’ll get a bit soggy — so enjoy ’em warm!
Homemade Hot Pockets Recipe FAQs
Can I make Homemade Hot Pockets ahead of time?
Totally! You can prep the dough and filling in advance. Just keep the dough wrapped in plastic wrap and store it in the fridge for up to 2 days. You can also assemble the pockets, freeze them on a baking sheet, then transfer to a zip-top bag once they’re solid. When you’re ready to bake, just pop them straight from the freezer into the oven—no need to thaw!
Why did my Homemade Hot Pockets turn out tough?
If your hot pockets are tough, it’s probably due to overworking the dough or using warm water. Remember, you want that ice-cold water for flakiness. When mixing in the butter, stop when it’s crumbly; don’t go for a smooth dough. Also, letting it chill properly makes a huge difference—20 minutes is key! You’ll know it’s right if it rolls out easily without sticking.
What can I substitute for shredded chicken in this recipe?
You could use shredded turkey or even cooked ground beef if that’s what you’ve got on hand. If you want something vegetarian, try sautéed mushrooms or spinach mixed with some ricotta cheese instead (trust me on this). Just make sure whatever you pick is fully cooked before adding it to your filling, so you’re not biting into anything raw!
How do I know when my Homemade Hot Pockets are done baking?
You’ll want to bake them until they’re golden-brown on top, which usually takes about 20-25 minutes at 400°F (200°C). The best way to check is by looking for that lovely golden color and giving them a light tap—you should hear a nice hollow sound when they’re ready. If they’re still pale after 25 minutes, give ’em a few extra minutes but keep an eye on them!
Final Thoughts on Homemade Hot Pockets
These Homemade Hot Pockets are totally worth making because they save time on busy weeknights without sacrificing flavor. Seriously, when you’ve got cooked chicken and cheese wrapped in flaky, buttery dough, it’s a game-changer. If you’ve been putting this off, tonight’s the night. You can customize the filling however you like — I’m thinking next time I might add some peppers for crunch! Drop a comment if you added anything — I’m always curious. Happy cooking!
Homemade Hot Pockets
Ingredients
Method
- In a large bowl, combine flour, salt, and sugar.
- Cut in the cold butter until the mixture resembles coarse crumbs.
- Stir in the cold water gradually until the dough comes together.
- Wrap the dough in plastic wrap and refrigerate for at least 20 minutes.
- In a bowl, mix together the shredded chicken, cheese, green onions, and barbecue sauce.
- Set the filling aside while you roll out the dough.
- Preheat your oven to 400°F (200°C).
- On a floured surface, roll out the chilled dough to about 1/8 inch thick.
- Cut the dough into rectangles, approximately 4x6 inches in size.
- Place a spoonful of filling onto one half of each rectangle.
- Fold the other half over the filling and seal the edges with a fork.
- In a small bowl, whisk together the egg and water to create the egg wash.
- Brush the egg wash over the tops of the hot pockets.
- Place the hot pockets on a baking sheet lined with parchment paper.
- Bake in the preheated oven for 20-25 minutes, or until golden brown.
- Remove from the oven and let cool for a few minutes.
- Serve warm and enjoy your homemade hot pockets!