I just pulled these Cookie Butter Cheesecake Cups from the fridge, and they’re looking incredible. The graham cracker base is all set, and I can already taste that creamy, cookie butter goodness waiting for me on top.
These little cups are perfect for nights when you’ve got a sweet craving but don’t want to spend hours in the kitchen. Unlike traditional cheesecakes that require baking and endless chilling, this version comes together in no time with no oven needed (trust me, your waistline will thank you). Quick and delicious!
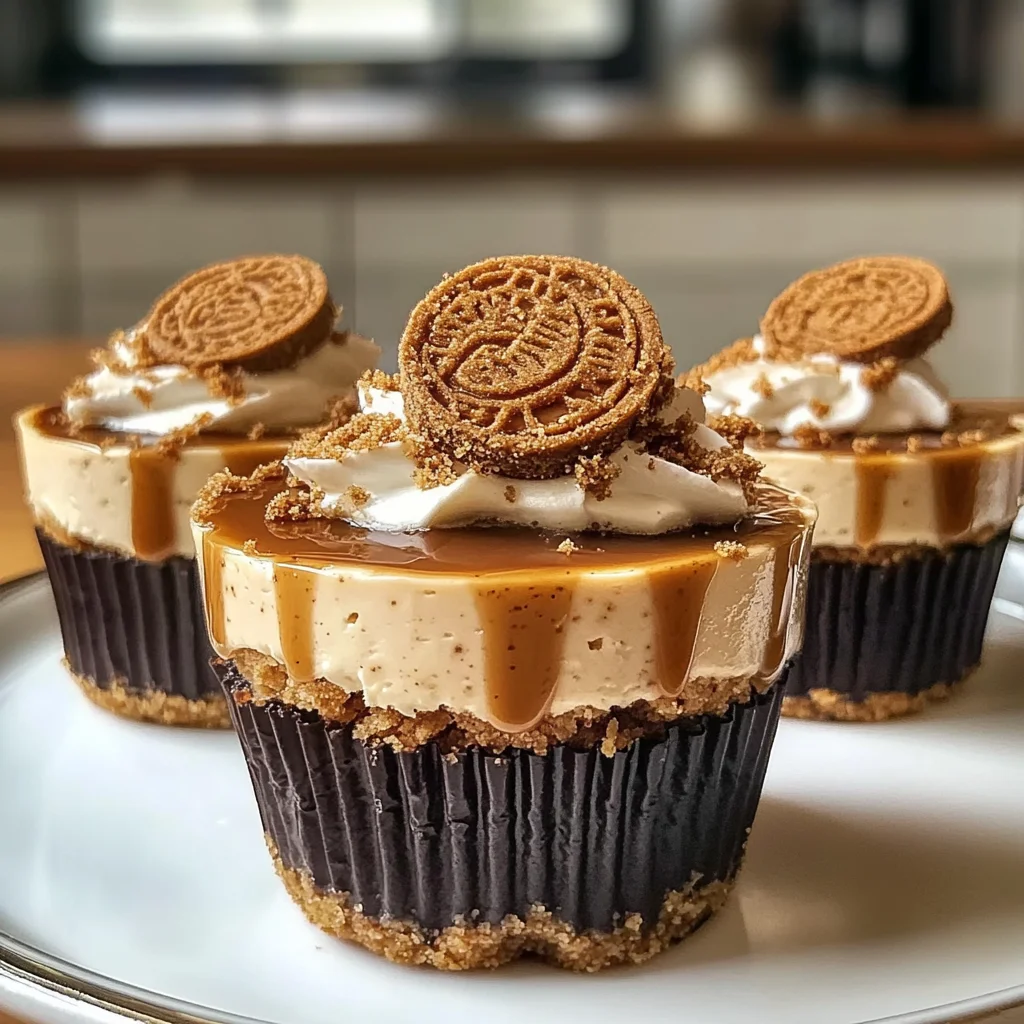
Why You’ll Love This Cookie Butter Cheesecake Cups
- Super Easy: Just mix, press, and chill — no baking needed, so you can whip this up in no time.
- Sticky-Sweet Flavor: The combo of cookie butter and cream cheese creates a rich taste that’s totally addictive (trust me!).
- Creamy Texture: It’s light yet decadent, with a smooth filling over a buttery graham cracker base that’s to die for.
- Versatile Treat: Great for parties or just because; you can switch up the toppings for different vibes, too!
- Chill Time Required: You’ll need at least 30 minutes for it to set, which feels like forever if you’re hungry!
Cookie Butter Cheesecake Cups Ingredients
For the Base:
graham cracker crumbs (1 cup) — Use finely crushed graham cracker crumbs or your crust’ll be too chunky.
unsalted butter (4 tablespoons) — Melt unsalted butter before mixing; otherwise, your crust won’t hold together.
granulated sugar (2 tablespoons) — Don’t skimp on granulated sugar, or your cheesecake will taste flat.
For the Cheesecake Filling:
cream cheese (8 ounces) — Room temperature cream cheese is a must; cold will leave you with lumps.
cookie butter (1/2 cup) — Go with Biscoff cookie butter; other brands just don’t have the same flavor.
powdered sugar (1/2 cup) — Sift powdered sugar to avoid clumps; lumpy frosting is a nightmare.
vanilla extract (1 teaspoon) — Use pure vanilla extract, not imitation; trust me, it makes all the difference.
whipped cream (1 cup) — Make whipped cream fresh, or it’ll deflate and look sad.
For the Topping:
cookie butter (1/4 cup) — Crushed cookies on top add crunch; otherwise, your dessert’s gonna be boring.
crushed cookies (2 tablespoons)
Full measurements in the recipe card below.
How to Make Cookie Butter Cheesecake Cups
1. Prepare the Base: In a mixing bowl, combine 1 cup of graham cracker crumbs, 4 tablespoons of melted unsalted butter, and 2 tablespoons of granulated sugar. Mix until you have a sandy texture that holds together when pressed.
2. Press Mixture: Firmly press the crumb mixture into the bottom of 6 serving cups. You want it compact and even (this helps it stay together). Pop these in the refrigerator to set while you work on the filling.
3. Beat Cream Cheese: In a large bowl, beat 8 ounces of softened cream cheese until it’s super smooth and creamy—no lumps allowed here!
4. Mix Filling Ingredients: Now add in 1/2 cup of cookie butter, 1/2 cup of sifted powdered sugar, and 1 teaspoon of vanilla extract. Mix until well combined and everything’s looking cohesive.
5. Fold in Whipped Cream: Gently fold in 1 cup of freshly made whipped cream until there are no streaks left (be careful not to overmix or it’ll deflate). This step gives your filling that light texture!
6. Assemble Cups: Spoon the cheesecake filling over your chilled graham cracker base in each cup, smoothing out the tops with a spatula. Return them to the fridge for at least 30 minutes to firm up—don’t rush this part; they won’t set properly if you don’t give them enough time.
7. Add Toppings: Before serving, drizzle 1/4 cup of cookie butter over the tops and sprinkle with 2 tablespoons of crushed cookies for that extra crunch factor. Serve chilled and enjoy your delicious Cookie Butter Cheesecake Cups!
Exact quantities in the recipe card below.
How to Store Cookie Butter Cheesecake Cups
- Room Temperature: Don’t leave these out for more than 2 hours. They’re best served chilled, so keeping them in the fridge is a smarter move.
- Refrigerator: Store them in an airtight container for up to 4 days. Just remember, the graham cracker base might get a little softer over time (not ideal, but still tasty).
- Freezer: You can freeze these cups for up to 2 months if you wrap them tightly in plastic wrap and then foil. Just note that the texture might change a bit when you thaw them.
- Reheating: There’s no need to reheat these, but if you want to serve ’em slightly warm, pop them in the microwave for about 10 seconds until you can smell that cookie butter aroma wafting through the kitchen.
What to Serve with Cookie Butter Cheesecake Cups?
It’s sweet and rich enough to stand alone, but a little something on the side can balance that sweetness nicely.
- Fresh Berries: The tartness of berries cuts through the sweetness, providing a refreshing contrast.
- Vanilla Ice Cream: A scoop adds creamy texture and helps tone down the richness of this dish.
- Espresso or Coffee: The bitterness from coffee complements the sweet flavors and enhances the overall experience.
- Citrus Sorbet: Try this for a cold, zesty contrast; it brightens up each bite while cleansing your palate.
- Chocolate-Covered Pretzels: Their salty crunch creates an exciting texture difference that offsets the smooth filling.
- Whipped Cream Topping: Just whip some heavy cream with a touch of sugar (about 5 minutes), then dollop on top for extra fluffiness.
- Mint Leaves: A few fresh leaves add brightness and aroma; just sprinkle them on before serving for a pop of color.
- Nutty Granola: Sprinkle some on top for added crunch; it takes just a minute to prep and elevates each bite!
Cookie Butter Cheesecake Cups Variations
Here’s how to play with this recipe and make it even more fun!
- Chocolate Drizzle: Add 1/4 cup melted chocolate on top before the cookie butter drizzle for extra sweetness.
- Nutty Crunch: Mix in 1/4 cup chopped nuts into the cheesecake filling for a delightful crunch.
- Spiced Cookie Butter: Swap out the cookie butter for 1/2 cup of spiced cookie butter (if you can find it) for a warm twist.
- Mini Cups: Use mini cups instead of standard ones to create bite-sized treats — perfect for parties!
- Caramel Swirl: Drizzle 2 tablespoons of caramel sauce through the filling before chilling for a sticky-sweet surprise.
- Layered Dessert: Alternate layers of cheesecake filling and crushed cookies in the cups for a cool visual effect.
- Extra Whipped Cream: Top each cup with an extra dollop of whipped cream before serving for added fluffiness!
Make Ahead Options for Cookie Butter Cheesecake Cups
I like to prep the base for these Cookie Butter Cheesecake Cups a day in advance. Just mix the graham cracker crumbs, melted butter, and sugar, then press it into your serving cups. Pop them in the fridge, and they’ll be good to go! The cheesecake filling also holds up well for about 2 days in an airtight container. Just remember not to add the cookie butter drizzle or crushed cookies until you’re ready to serve; they’re best fresh so they don’t get soggy. Honestly, the crust stays crunchy longer than I expect, but whipped cream? It’s gotta be fresh for that fluffy texture. Keep it simple — prep ahead and enjoy!
Cookie Butter Cheesecake Cups Recipe FAQs
Can I make Cookie Butter Cheesecake Cups ahead of time?
Absolutely! These cups are perfect for making a day in advance. Just prepare everything, assemble the cups, and refrigerate them. They actually taste better after chilling since the flavors have time to meld together. Just make sure you drizzle the cookie butter and sprinkle the crushed cookies on right before serving to keep them fresh and crunchy (nobody likes a soggy topping!).
What can I substitute for graham cracker crumbs in this dish?
If you can’t find graham cracker crumbs, crushed Oreos or digestive biscuits work great as alternatives. Just keep in mind that they’ll change the flavor profile a bit (Oreo base = chocolatey goodness!). You want something that holds together well when mixed with melted butter, so stick to similar textures. And remember to adjust sugar if using something sweeter.
Why did my Cookie Butter Cheesecake Cups turn out lumpy?
Chances are your cream cheese wasn’t softened enough before mixing. Room temperature cream cheese blends smoothly without lumps—cold cream cheese just won’t cooperate (trust me on this). Make sure you beat it until it’s super creamy before adding anything else. If you do see lumps, you could try blending it longer, but better luck next time if you start with room temp!
How do I know when the filling is ready?
You’ll want to mix until everything’s well combined and looks smooth—no streaks or lumps should be visible. A good visual cue is that it should appear fluffy and light after folding in the whipped cream. If it feels dense or heavy, keep folding gently until it reaches that airy texture you’re aiming for. Don’t rush this part; it’ll pay off later!
Final Thoughts on Cookie Butter Cheesecake Cups
These Cookie Butter Cheesecake Cups are a total flavor payoff for the effort you put in. I mean, who doesn’t love that creamy, cookie-buttery goodness piled on top of a buttery graham cracker base? It’s a fun twist on cheesecake that feels fancy without taking hours in the kitchen. If you’ve been putting this off, tonight’s the night. Give them a try, and let me know how yours turned out in the comments!
Cookie Butter Cheesecake Cups
Ingredients
Method
- In a mixing bowl, combine the graham cracker crumbs, melted butter, and granulated sugar.
- Mix until the crumbs are evenly coated and then press the mixture into the bottom of 6 serving cups.
- Place the cups in the refrigerator to set while preparing the filling.
- In a large bowl, beat the softened cream cheese until smooth.
- Add the cookie butter, powdered sugar, and vanilla extract, mixing until well combined.
- Gently fold in the whipped cream until no streaks remain.
- Spoon the cheesecake filling over the chilled graham cracker base in each cup.
- Smooth the tops with a spatula and return to the refrigerator for at least 30 minutes to set.
- Before serving, drizzle cookie butter over the tops of the cheesecake cups.
- Sprinkle the crushed cookies on top for garnish.
- Serve chilled and enjoy your delicious Cookie Butter Cheesecake Cups!