
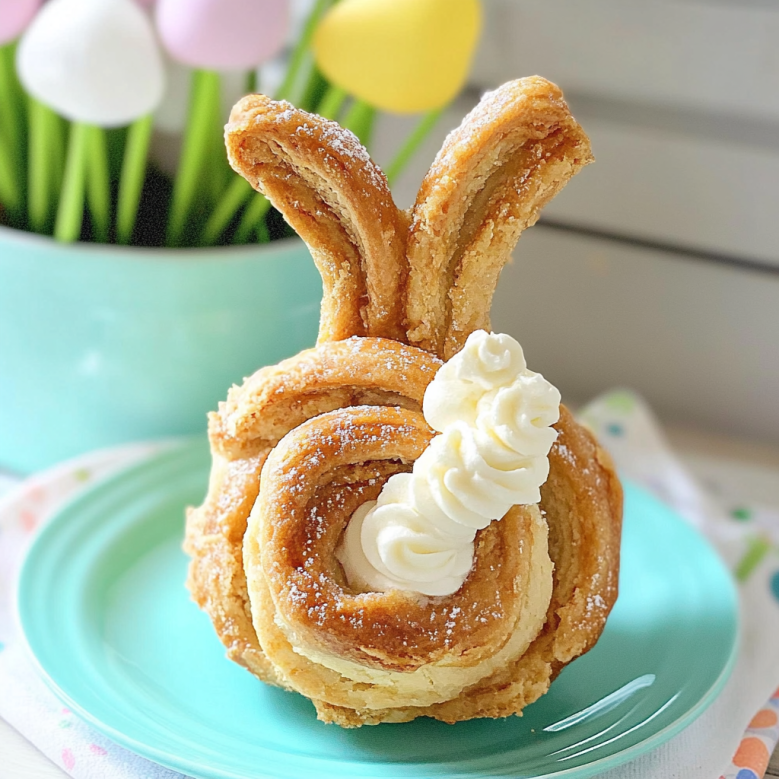
Easter Bunny Twists are the kind of treats that make your taste buds do a happy little jig. Imagine buttery, flaky dough twisted into adorable bunny shapes, filled with chocolate or sweet cream cheese, and baked to golden perfection. The aroma wafts through your kitchen, pulling family and friends in like a delicious magnet, promising an incredible flavor experience.
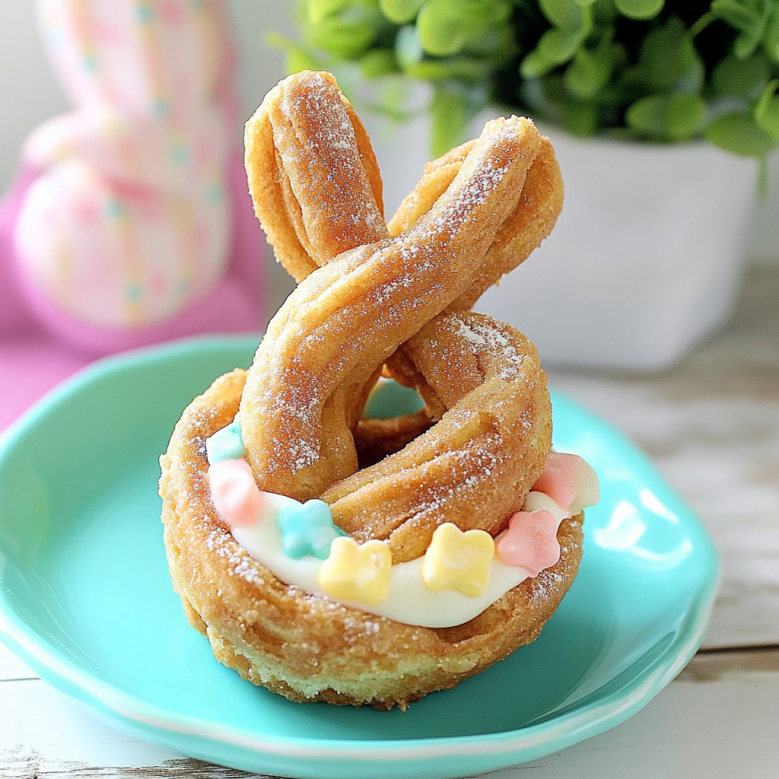
These delightful Easter Bunny Twists are perfect for spring gatherings, holiday brunches, or just because you want to indulge in something sweet. I remember the first time I made these treats; my kids’ eyes lit up like they’d found hidden treasure when they spotted those cute bunny shapes on the table. Each bite is a celebration of flavors and textures that will leave you wanting more!
Why You'll Love This Easter Bunny Twists
- This incredible Easter Bunny Twists transforms simple everyday ingredients into restaurant-quality flavors that will blow your mind completely.
- Foolproof recipe techniques guarantee perfect results every single time, making even novice cooks feel like professional chefs instantly.
- Stunning visual appeal with gorgeous colors and mouthwatering aromas creates the ultimate Instagram-worthy dish for any special occasion.
- Endlessly adaptable for different dietary needs while working beautifully for meal prep, date nights, or entertaining large groups effortlessly.
I’ll never forget when my niece took one bite and exclaimed it was better than her favorite chocolate bar!
Essential Ingredients
Here’s what you’ll need to make this delicious dish:
- Puff Pastry: Use store-bought puff pastry for convenience; just make sure it’s thawed before using.
- Chocolate Chips: Choose semi-sweet or milk chocolate chips depending on your sweetness preference.
- Cream Cheese: Opt for full-fat cream cheese for a creamy filling that pairs perfectly with chocolate.
- Egg Wash: A simple whisked egg gives a beautiful golden finish to your bunny twists.
- Sugar: Sprinkle granulated sugar on top before baking to add a sweet crunch.
The full ingredients list, including measurements, is provided in the recipe card directly below.
How to Make Easter Bunny Twists
Prepare the Oven and Baking Sheet: Preheat your oven to 400°F (200°C). Line a baking sheet with parchment paper so your bunnies don’t stick—no one likes an imprisoned bunny.
Roll Out the Puff Pastry: On a lightly floured surface, roll out the puff pastry until it’s about 1/8 inch thick. You want it thin enough to be flaky but sturdy enough to hold its shape—think delicate yet strong like your favorite superhero!
Cut the Pastry into Strips: Use a sharp knife or pizza cutter to slice the pastry into rectangles about 4×6 inches. This is where the magic happens; each rectangle will become a bunny body ready to hop into the oven.
Add Your Fillings: Place a spoonful of chocolate chips or cream cheese near one end of each rectangle. Don’t be shy! The twistier the filling, the better! Just leave some space around the edges so they can seal properly.
Create Bunny Shapes: Fold over the pastry from the filling end and twist both ends together like you’re creating an adorable little bunny tail. Pinch at the ends to secure them tight—no bunny wants their goodies spilling out during baking!
Bake and Serve: Brush each twist with egg wash and sprinkle sugar on top for extra sweetness. Bake them in your preheated oven for 15-20 minutes until golden brown and puffed up like they’re ready to leap off your plate!
Easter Bunny Twists are not just another pretty face; they are versatile enough for any occasion while bursting with flavors that will keep everyone coming back for seconds (and thirds). Enjoy these delightful pastries warm from the oven or at room temperature—they’re delicious either way!
This showstopping Easter Bunny Twists delivers restaurant-quality results using simple ingredients you probably already have at home. The perfect balance of textures and flavors creates an unforgettable dining experience that will have everyone asking for seconds. Picture-perfect presentation with vibrant colors makes this dish absolutely Instagram-worthy and guaranteed to impress any dinner guest. Incredibly versatile recipe that works beautifully for weeknight dinners, meal prep, special occasions, or even outdoor entertaining sessions.
Perfecting the Cooking Process
Start by preheating the oven to 375°F (190°C). Prepare your dough first, then sculpt those adorable bunny shapes while your oven warms up. Once shaped, let them rest briefly before baking until golden brown. This sequence ensures even cooking and a delightfully fluffy texture.
Add Your Touch
Feel free to customize your Easter Bunny Twists by experimenting with different fillings! Swap out the traditional chocolate for fruit preserves or cream cheese if you desire. Add some colorful sprinkles on top for a festive flair that would make any bunny proud.
Storing & Reheating
Store any leftover Easter Bunny Twists in an airtight container at room temperature for up to two days. To reheat, pop them in a 350°F (175°C) oven for about 5-7 minutes until warm and crispy again. Avoid microwaving as it can lead to a chewy texture instead of the desired crispiness.
Chef's Helpful Tips for Easter Bunny Twists
- Master the dough by letting it rest adequately; this enhances elasticity and makes shaping easier.
- Use egg wash on top to achieve that beautiful golden finish during baking; it’s a game-changer!
- Don’t overfill your bunnies; too much filling can cause them to burst open while baking, leading to messy results.
Sharing this recipe reminds me of that one Easter when my niece declared my bunny twists were “better than chocolate.” Her wide eyes and giggles as she devoured them still warm from the oven made all my efforts worthwhile!
FAQ
What is the best filling for Easter Bunny Twists?
The best filling depends on personal preference! Traditional options include chocolate or Nutella, but feel free to experiment with cream cheese or fruit preserves for a unique twist. Just remember not to overfill them!
Can I make Easter Bunny Twists ahead of time?
Absolutely! You can prepare the dough and shape the bunnies in advance, refrigerate them overnight, and bake fresh in the morning. This way, they’ll be warm and ready just in time for your Easter brunch!
How do I achieve a shiny finish on my bunny twists?
To achieve that lovely golden sheen, brush your bunnies with an egg wash before baking. Simply beat one egg with a tablespoon of water and gently apply it over each bunny’s surface using a pastry brush.
Can I freeze leftover Easter Bunny Twists?
Yes! Freeze leftovers after they have completely cooled down. Wrap each twist individually in plastic wrap and store them in an airtight container. When you’re ready to enjoy them again, thaw overnight in the fridge before reheating.
Conclusion for Easter Bunny Twists
Easter Bunny Twists are not only visually stunning but also deliciously versatile! With easy customization options and straightforward preparation steps, these treats are perfect for impressing family and friends alike. Remember the key points: allow your dough to rest, don’t overfill those cute little bunnies, and always finish with an egg wash for visual appeal. Enjoy crafting these delightful treats this holiday season!
Easter Bunny Twists

Easter Bunny Twists are delightful, flaky pastries shaped like cute bunnies and filled with rich chocolate or creamy cheese. These whimsical treats are perfect for spring gatherings, holiday brunches, or a sweet indulgence any time. With an irresistible aroma that draws family and friends to the kitchen, each bite offers a scrumptious blend of textures and flavors that will keep everyone coming back for more.
- Prep Time: 20 minutes
- Cook Time: 20 minutes
- Total Time: 40 minutes
- Yield: Approximately 8 servings 1x
- Category: Dessert
- Method: Baking
- Cuisine: American
Ingredients
- 1 sheet puff pastry (thawed)
- 1 cup semi-sweet chocolate chips
- 4 oz cream cheese (softened)
- 1 egg (for egg wash)
- 1 tbsp granulated sugar
Instructions
- Preheat your oven to 400°F (200°C) and line a baking sheet with parchment paper.
- Roll out the thawed puff pastry on a floured surface until about 1/8 inch thick.
- Cut the pastry into rectangles measuring approximately 4×6 inches.
- Spoon chocolate chips or cream cheese onto one end of each rectangle, leaving space to seal.
- Fold over the pastry from the filling end and twist both ends together to form bunny shapes, sealing tightly.
- Brush with egg wash and sprinkle with sugar before baking for 15-20 minutes until golden brown.
Nutrition
- Serving Size: 1 serving
- Calories: 210
- Sugar: 6g
- Sodium: 150mg
- Fat: 12g
- Saturated Fat: 7g
- Unsaturated Fat: 4g
- Trans Fat: 0g
- Carbohydrates: 22g
- Fiber: 1g
- Protein: 3g
- Cholesterol: 40mg
Keywords: Experiment with various fillings such as fruit preserves or Nutella for added excitement. Let the dough rest before shaping for better elasticity. Store leftovers in an airtight container at room temperature for up to two days.


